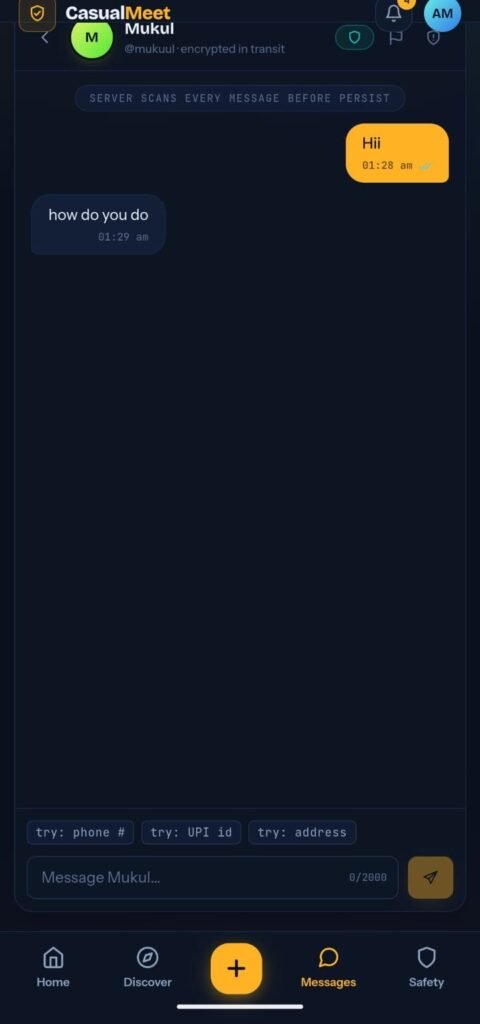
I recently built a chat feature for a meetup app. The stack is React on the front, Express and MongoDB on the back, and Socket.IO to connect them.
A basic chat is easy. You send a message and it shows up. The harder part is everything around it: knowing who is allowed to join a conversation, showing when someone is typing, marking messages as read, and making sure one message never appears twice.
This post covers how I did each of those. At the end, I’ll show you a bug I ran into and how I fixed it.
How the pieces fit together
I split the work between two tools.
REST API handles loading the chat list, loading message history, and sending messages. Sending through REST means the server can check the message and save it to MongoDB before anyone else sees it.
Socket.IO handles live events: a new message arriving, someone typing, and someone reading your messages.
The flow looks like this. You hit send. The server saves your message, then pushes it to everyone in that chat. Because the save happens first, any message people see is already stored.
Step 1: Connect the socket
On the client, I create one socket connection and attach the user’s login token to it.
socket = io(getSocketUrl(), {
  auth: { token: token || '' },
  transports: ['websocket', 'polling'],
  reconnection: true,
  reconnectionAttempts: Infinity,
  reconnectionDelay: 1000,
  reconnectionDelayMax: 5000,
});
Two settings are worth explaining.
transportstells Socket.IO to try a WebSocket first. If a network blocks it, it falls back to regular HTTP polling. The chat keeps working either way.reconnectionmeans the app reconnects on its own if the user loses signal for a moment. They never need to refresh.
Step 2: Check who is connecting
The server shouldn’t accept just anyone. Socket.IO lets you add a check during the handshake, before the connection is allowed.
io.use(async (socket, next) => {
  const token = socket.handshake.auth?.token;
  if (!token) return next(new Error('Authentication token required'));

  try {
    const payload = jwt.verify(token, getJwtSecret()) as { userId: string };
    const user = await User.findById(payload.userId);
    if (!user) return next(new Error('User not found'));
    (socket as any).user = user;
    next();
  } catch {
    next(new Error('Invalid authentication token'));
  }
});
This is the same login token the rest of the app uses. If it’s missing or wrong, the connection is refused. I wrote about how those tokens work in my JWT authorization post.
Step 3: Keep every chat private
Socket.IO uses “rooms.” Each conversation gets its own room, and only people in the room receive its messages.
When someone opens a chat, the app asks the server to add them to that room. The server doesn’t just say yes. It first checks that this person is a member of the chat.
socket.on('chat.join', async (chatId, callback) => {
  const chat = await Chat.findOne({ _id: chatId, participants: user._id });
  if (!chat) return callback?.({ error: 'Chat not found or access denied' });
  socket.join(`chat:${chatId}`);
  callback?.({ success: true, chatId });
});
Without this check, anyone who guessed a chat ID could listen in. Never trust the client to say where it belongs.
Step 4: Send a message
The client posts the message to the REST endpoint. The server saves it and then tells everyone in the room.
const message = await Message.create({
  chatId: chat._id,
  senderId: user._id,
  content: content.trim(),
  type: 'text',
  status: 'sent',
});

emitToChat(chat._id.toString(), 'new_message', { message, chatId: chat._id });
Step 5: Show when someone is typing
Typing status is temporary, so I don’t save it. It only travels over the socket.
Each time the user types, the app sends “typing started” and resets a two-second timer. If two seconds pass with no typing, it sends “typing stopped.”
const handleInputChange = (e) => {
  setText(e.target.value.slice(0, 2000));
  emitTyping(chatId, otherUserId, true);
  clearTimeout(typingTimeoutRef.current);
  typingTimeoutRef.current = setTimeout(() => {
    emitTyping(chatId, otherUserId, false);
  }, 2000);
};
On the server, socket.to(room).emit(...) sends the event to everyone in the room except the sender. So you never see your own typing indicator.
Step 6: Show when messages are read
When the other person opens the chat, the app tells the server. One database update marks all of their unread messages as read, and then the room is notified.
await Message.updateMany(
  { chatId: data.chatId, senderId: { $ne: user._id }, status: { $ne: 'read' } },
  { status: 'read' }
);
emitToChat(data.chatId, 'chat.read', { chatId: data.chatId, readerId: userIdStr });
The sender’s screen hears the event and updates the ticks next to their messages.
The bug: the same message twice
This one is easy to miss, and it only happens sometimes.
My code for receiving a message already checks for duplicates:
const handleNewMessage = (payload) => {
  const incoming = payload.message;
  setMessages((prev) =>
    prev.some((m) => m._id === incoming._id) ? prev : [...prev, incoming]
  );
};
But the code for sending a message did not:
const res = await api.chats.sendMessage(chatId, body);
setMessages((prev) => [...prev, res.message]); // no duplicate check
Here’s why that matters. The sender is also in the chat room, so they receive their own message through the socket. They also get it back from the REST call. The same message arrives twice, by two different routes. Sometimes the socket event wins the race, sometimes the REST response does. When the check is missing on one path, you get a double.
The fix is to use one function for adding messages and call it from both places.
const addMessage = useCallback((incoming: ChatMessageDTO) => {
  setMessages((prev) =>
    prev.some((m) => m._id === incoming._id) ? prev : [...prev, incoming]
  );
}, []);

// in the socket handler
addMessage(payload.message);

// in the send handler
const res = await api.chats.sendMessage(chatId, body);
if (res?.message) addMessage(res.message);
Now it doesn’t matter which one arrives first. The message ID decides.
What I’d improve next
- Instant sending. Right now the message appears after the server replies. I want it to appear immediately with a “sending” label, then switch to “sent.” If it fails, show a retry button.
- Smarter history loading. I load older messages by page number. Using the last message’s ID as a starting point stays fast even in long chats.
What to take away
- Use REST for things you want checked and saved, and sockets for live updates.
- Check the login token during the socket handshake.
- Verify on the server that a user belongs to a chat before letting them join its room.
- Keep typing status out of the database.
- Add messages to your state through a single function that blocks duplicates.
Related posts: JWT Authorization with User, Moderator and Admin Roles in Node.js, and Building a Multi-Platform React App with Capacitor.
Building a Multi-Platform React App with Capacitor (Web Mobile & Admin) · knowabteverything.com
1 thought on “How I Built Real-Time Chat in React with Socket.IO”