
How to Import Product Data into Supabase Using a CSV File (Without Writing SQL) Setting up a database is often the part of a project that scares beginners the most. Terms like tables, schemas, and SQL queries can make a simple task feel complicated.
The good news is that Supabase makes importing data surprisingly easy. If you already have product information stored in Excel or Google Sheets, you can turn that spreadsheet into a database table in just a few minutes—without writing a single SQL command.
I’ve used this approach when building prototypes, testing mobile apps, and creating sample datasets for client projects. Instead of spending time creating tables manually, uploading a CSV file allowed me to get a working database almost instantly.
In this guide, you’ll learn exactly how to import sample product data into Supabase using a CSV file, how the process works behind the scenes, and the common mistakes to avoid.
Table of Contents
- Why Use CSV Import in Supabase?
- What You’ll Need Before Starting
- Preparing Your Product Data
- Creating a CSV File
- Step-by-Step: Importing a CSV into Supabase
- How Supabase Creates Tables Automatically
- Real-World Example
- Common Import Errors and Fixes
- Best Practices for Product Data
- Frequently Asked Questions
- Final Thoughts
Why Use CSV Import in Supabase?
Supabase is built on PostgreSQL, one of the world’s most trusted database systems. While PostgreSQL is incredibly powerful, not everyone wants to start by writing database queries.
That’s where CSV import becomes useful.
Instead of manually creating tables and defining every column, you can upload a spreadsheet and let Supabase do most of the work.
Benefits of Using CSV Import
- No SQL knowledge required
- Fast database setup
- Ideal for prototypes and MVPs
- Easy migration from Excel or Google Sheets
- Reduces manual data entry mistakes
- Automatically generates database tables
For many small projects, the entire process takes less than five minutes.
What You’ll Need Before Starting
Before importing data, make sure you have:
- A Supabase project
- Product data stored in Excel or Google Sheets
- A CSV file containing that data
- Permission to edit your Supabase database
If you’re building an online store, inventory tracker, or learning database fundamentals, that’s all you need.
Preparing Your Product Data
A CSV file works best when the data is clean and organized.
Think of each column as a future database field and each row as a product record.
Here’s a simple example:
| Product Name | Category | Price | Stock |
|---|---|---|---|
| Wireless Mouse | Electronics | 799 | 50 |
| Bluetooth Speaker | Electronics | 1999 | 20 |
| Water Bottle | Accessories | 299 | 100 |
| Laptop Stand | Office | 1499 | 30 |
When exported as a CSV file, the data looks like this:
Product Name,Category,Price,Stock
Wireless Mouse,Electronics,799,50
Bluetooth Speaker,Electronics,1999,20
Water Bottle,Accessories,299,100
Laptop Stand,Office,1499,30
This simple structure is enough for Supabase to create a table automatically.
Creating a CSV File
Using Microsoft Excel
- Open your spreadsheet.
- Verify that the first row contains column names.
- Click File → Save As.
- Choose CSV UTF-8 (Comma Delimited).
- Save the file.
Using Google Sheets
- Open your sheet.
- Select File → Download.
- Choose Comma Separated Values (.csv).
That’s it. Your spreadsheet is now ready for import.
Step-by-Step: Importing a CSV into Supabase
Let’s walk through the process using the Supabase dashboard.
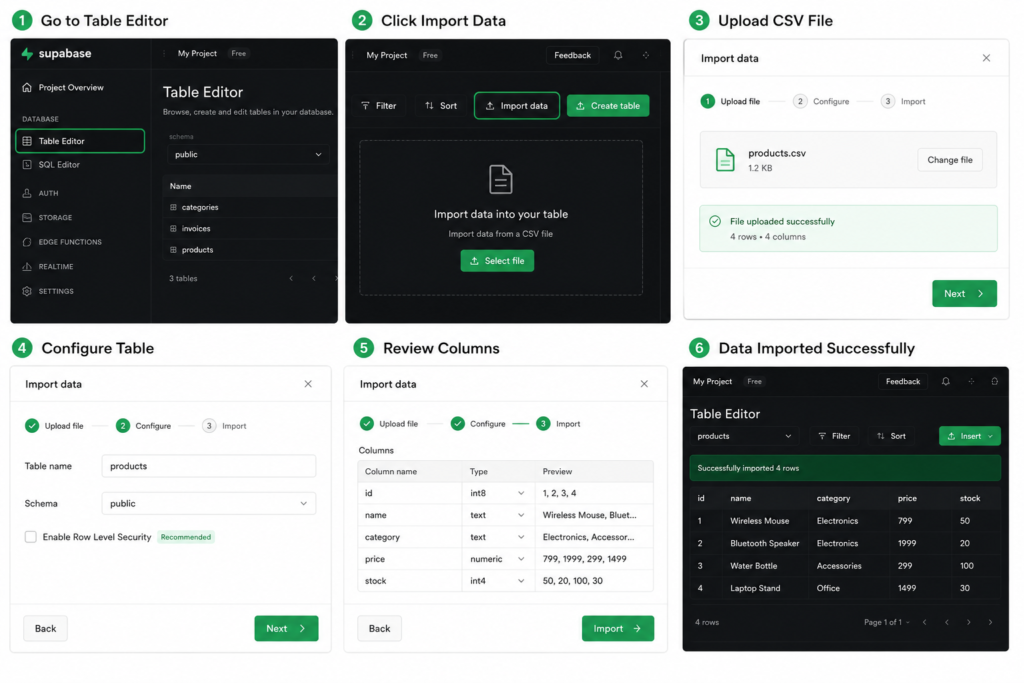
Step 1: Open Your Project
Log in to your Supabase account and select the project where you want to store the product data.
Step 2: Go to the Table Editor
From the left navigation menu:
Database → Table Editor
This section allows you to manage tables visually without using SQL.
Step 3: Click “Import Data”
Look for the Import Data button.
Depending on the dashboard version, it may appear:
- In the upper-right corner
- Inside the Table Editor toolbar
Select it to begin the import process.
Step 4: Upload Your CSV File
Choose the CSV file from your computer.
Supabase will immediately analyze the file and display a preview.
Before continuing, review:
- Column names
- Number of rows
- Data formatting
- Detected data types
This quick check can prevent issues later.
Step 5: Name Your Table
You’ll be asked to create a table name.
For example:
products
Most users can leave the schema set to:
public
The public schema is the default location for most application data.
Step 6: Verify Column Types
One feature I appreciate about Supabase is its ability to detect data types automatically.
For the sample data above, it might create:
| Column | Type |
|---|---|
| Product Name | Text |
| Category | Text |
| Price | Numeric |
| Stock | Integer |
Most of the time the suggestions are accurate, but it’s worth reviewing them.
A price column accidentally detected as text can create problems later when sorting or calculating totals.
Step 7: Import the Data
Click Import.
Supabase will:
- Create the table
- Add all columns
- Insert every record
- Generate APIs automatically
Within seconds, your database is ready to use.
How Supabase Creates Tables Automatically
Many beginners wonder what happens after clicking the Import button.
Behind the scenes, Supabase performs several database operations automatically.
It:
- Creates a PostgreSQL table.
- Generates columns based on CSV headers.
- Assigns data types.
- Inserts records.
- Makes the table available through Supabase APIs.
Without the import tool, a developer would normally need to write multiple SQL statements to achieve the same result.
The CSV importer simply automates that process.
Real-World Example
A few months ago, I helped migrate a small product catalog from a spreadsheet into a test environment for a mobile shopping application.
The spreadsheet contained over 700 products.
The traditional approach would have involved:
- Designing the database structure
- Creating tables manually
- Writing import scripts
- Testing insertion queries
Instead, we exported the spreadsheet as a CSV file, uploaded it into Supabase, reviewed the detected column types, and completed the import in a matter of minutes.
For prototypes and MVPs, that time saving can be significant.
Common Import Errors and How to Fix Them
Even though the process is straightforward, a few mistakes appear regularly.
Missing Column Headers
Incorrect:
Wireless Mouse,Electronics,799,50
Correct:
Product Name,Category,Price,Stock
Wireless Mouse,Electronics,799,50
Always include column names in the first row.
Mixed Data Types
Consider this example:
Price
799
1999
ABC
The value “ABC” doesn’t belong in a numeric field.
When data types are inconsistent, Supabase may not assign the correct column type.
Extra Commas
An extra comma can shift values into the wrong column.
For large spreadsheets, this can create hundreds of incorrectly imported records.
Before uploading, open the CSV and perform a quick review.
Duplicate Products
Repeated imports sometimes create duplicate entries.
A simple solution is adding a unique product ID column:
ProductID
1001
1002
1003
This makes future updates much easier.
Best Practices for Product Data
Good database habits early on can save hours of cleanup later.
Use Descriptive Column Names
Instead of:
- data1
- field
- value
Use:
- product_name
- category
- product_price
- stock_quantity
The table becomes much easier to understand.
Keep Naming Consistent
Choose one style and stick with it.
Examples:
product_name
or
ProductName
Avoid mixing formats across columns.
Include Unique Product IDs
Unique identifiers help with:
- Inventory management
- Product updates
- Data synchronization
- Duplicate prevention
Clean Your Data Before Importing
Check for:
- Empty rows
- Duplicate entries
- Misspelled categories
- Incorrect prices
- Missing values
Clean data leads to a more reliable database.
Frequently Asked Questions
Can Supabase create a table directly from a CSV file?
Yes. Supabase can automatically generate a new table based on the CSV column structure and import the data in one process.
Do I need to know SQL?
No. The Table Editor and CSV importer allow beginners to create tables and add records without writing queries.
Can I import data from Excel?
Yes, but you’ll first need to save or export the spreadsheet as a CSV file.
Is there a limit to how much data I can import?
The practical limit depends on your Supabase plan and project resources. For very large datasets, batch imports or automated scripts may be more efficient.
Can I edit imported records later?
Absolutely. After importing, you can modify records directly from the Table Editor or through the generated APIs.
Does Supabase generate APIs automatically?
Yes. Once the table exists, Supabase automatically exposes it through REST and client APIs, making it easy to connect your web or mobile application.
Final Thoughts
For beginners, importing a CSV file into Supabase is one of the fastest ways to move from a spreadsheet to a real database.
Instead of learning SQL before you can start building, you can upload existing product data, let Supabase create the table automatically, and begin working with your application immediately.
Whether you’re developing an e-commerce store, testing a React Native app, building a student project, or creating an internal inventory system, CSV import removes much of the complexity associated with database setup.
It’s a simple feature, but one that can save a surprising amount of time—and often becomes the quickest route from idea to working application.
Read about UI Components and Database Setup – knowabteverything
Tech & How-To – knowabteverything
Supabase | The Open Source Firebase Alternative

About Amish
Hi, I’m Amish, and developer.
I write practical React Native, Node.js, MongoDB, and Supabase tutorials based on real projects and testing.
[…] Read about How to Import Product Data into Supabase Using a CSV File (Without Writing SQL) – knowabtevery… […]
[…] How to Import Product Data into Supabase Using a CSV File (Without Writing SQL) – knowabtevery… […]
[…] Read about How to Import Product Data into Supabase Using a CSV File (Without Writing SQL) – knowabtevery… […]
[…] How to Import Product Data into Supabase Using a CSV File (Without Writing SQL) – knowabtevery… […]