How to take care of Indoor Plants?
How to take care of Indoor Plants? Bringing plants into your home transforms a space but keeping them thriving requires moving past basic guesswork. Most plant guides rely on vague advice—telling you to water “once a week” or place a plant in “bright, indirect light.” However, indoor environments vary wildly based on geographic location, window placement, seasonal shifts, and home heating systems.
This guide bridges the gap between botanical theory and practical, real-world application. Whether you are caring for a low-maintenance Snake Plant or maintaining a temperamental Calathea, mastering three core pillars—Light, Water, and Soil—will give you the skills to keep any houseplant healthy and thriving.
Featured Snippet: Quick Care Summary
How Do You Care for Indoor Plants?
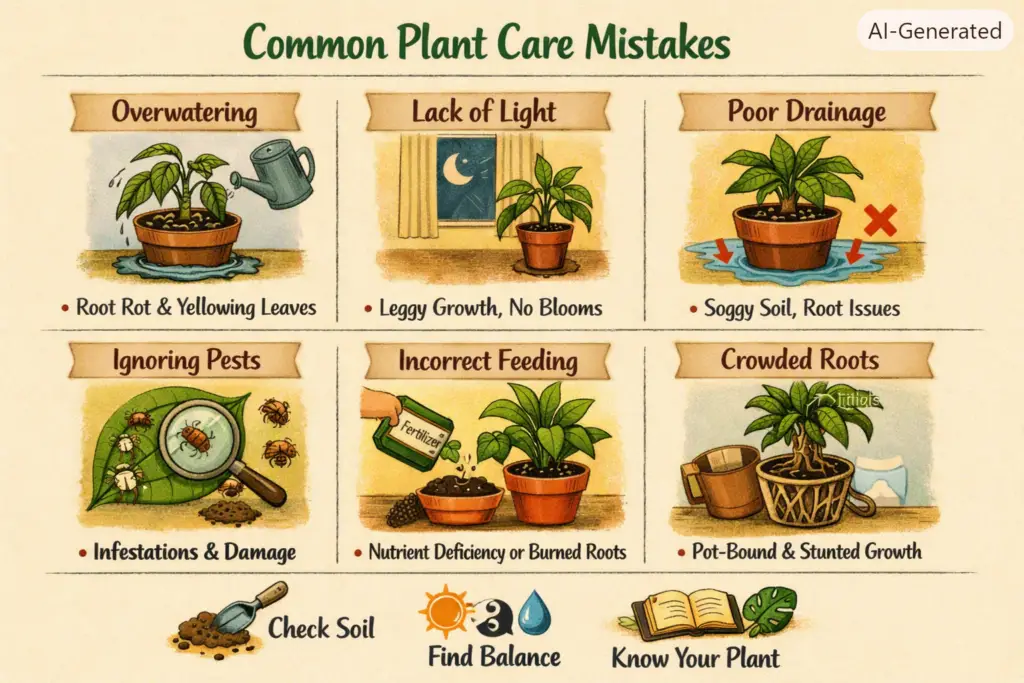
To keep indoor plants healthy, balance three essentials:
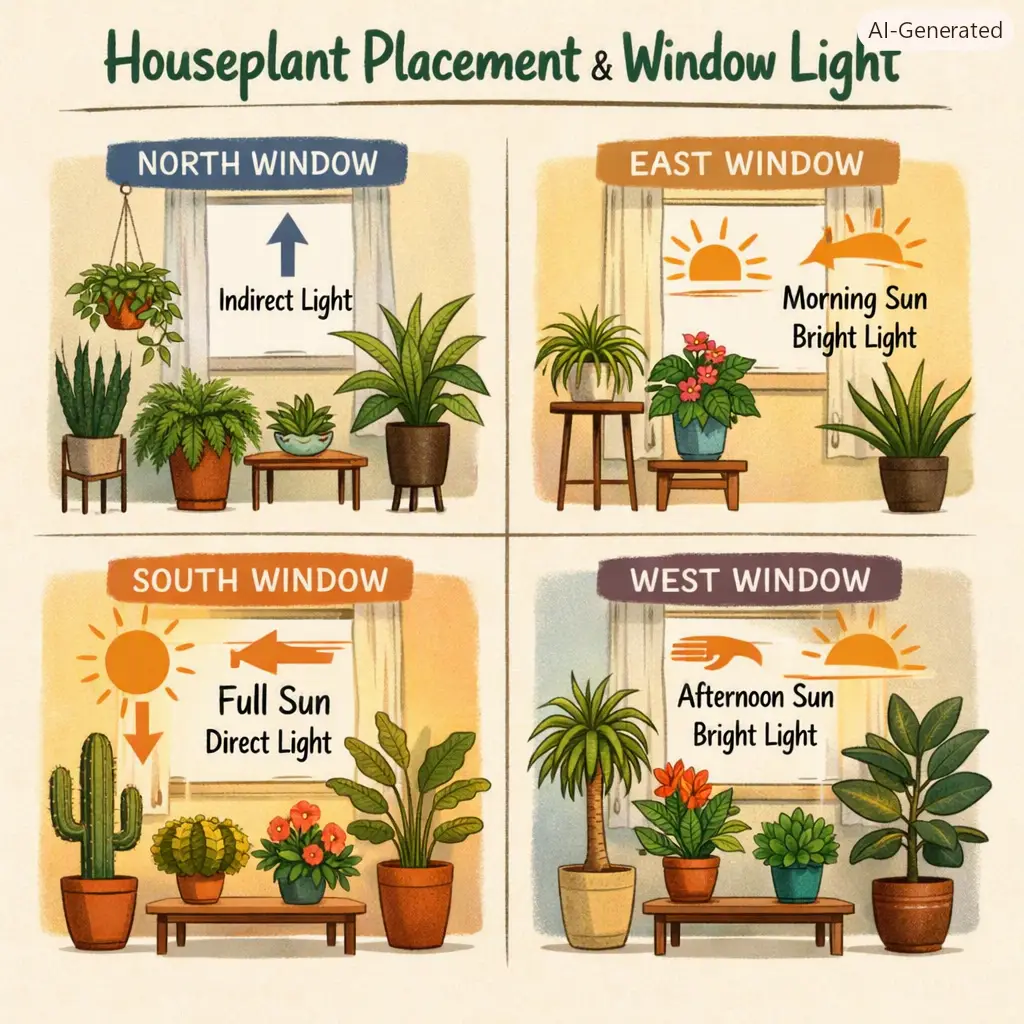
- Light: Match plants to window directions (e.g., South-facing for high light, East-facing for bright indirect).
- Water: Drench soil deeply only when the top 1–2 inches feel dry or the pot feels lightweight. Avoid calendar-based watering.
- Soil: Use well-aerated, porous potting mixes containing perlite or orchid bark to prevent root suffocation.
1. Decoding Houseplant Lighting (Beyond “Bright, Indirect Light”)
Light drives photosynthesis, which fuels every aspect of a plant’s growth, from leaf production to root expansion. Outdoors, light spreads evenly across wide areas. Indoors, it drops off sharply the further you move away from a window.
[Window Glass]  --->  3 ft away  --->  6 ft away  --->  10+ ft away
100% Light            ~50% Light        ~25% Light        <10% Light
(Direct/Bright)       (Medium)          (Low Light)       (Targeted Grow Light Needed)
Measuring Natural Light: Windows, Foot-Candles & Distances
To provide the right environment, replace vague descriptions with measurable units. Light intensity is measured in foot-candles (FC) or Lux ($1text{ FC} approx 10.76text{ Lux}$). You can measure this using a standard light meter or a smartphone light meter app.
- Direct Light (1,000–5,000+ FC): Sunlight strikes the plant’s leaves directly without filtration.
- Best Placement: Unobstructed South- or West-facing windows.
- Ideal For: Cacti, succulents, bird of paradise, citrus trees.
- Bright, Indirect Light (200–500 FC): The area receives strong illumination, but direct sun rays do not hit the foliage, or they pass through a sheer curtain.
- Best Placement: Within 2 to 4 feet of an East-facing window, or 3 to 6 feet back from an unobstructed South or West window.
- Ideal For: Monsteras, Fiddle Leaf Figs, Philodendrons, Pothos.
- Medium Light (75–200 FC): Ambient illumination that allows you to comfortably read a book without turning on an overhead light.
- Best Placement: 6 to 8 feet back from a South/West window, or directly in front of a North-facing window.
- Ideal For: Ferns, Calatheas, Syngoniums, Parlor Palms.
- Low Light (25–75 FC): The minimum threshold required for shade-tolerant plants to maintain their structure without actively declining.
- Best Placement: Deep inside a room or directly beside a small North-facing window.
- Ideal For: ZZ Plants, Snake Plants, Cast Iron Plants.
- Looking for hardy options? Check out our curated list of the best beginner houseplants to start building your indoor collection.
The Inverse-Square Law in Home Care: Light intensity decreases with the square of the distance from the source ($I propto 1/d^2$). Moving a plant from 2 feet away from a window to 4 feet away reduces available light by 75%, not 50%. If natural sunlight falls short, explore ourgrow lights guide for indoor plantsto supplement dark rooms.
Signs Your Plant Isn’t Getting the Right Light
Plants communicate light imbalances quickly if you know what to look for:
- Too Little Light: Etiolation (spindly, stretched stems with wide gaps between leaves), small replacement leaves, loss of leaf variegation (turning solid green to maximize chlorophyll), and soil that stays wet for weeks because photosynthesis has slowed down.
- Too Much Light: Sunscald (bleached white or yellow patches on leaves), scorched brown margins, crispy curled edges, or foliage that feels papery and hot to the touch.
2. Mastering Water & Humidity: The Physics of Hydration
Improper watering is responsible for most indoor plant loss. The most important lesson in plant care is understanding what overwatering actually means: Overwatering is caused by frequency and lack of soil oxygen—never by the volume of water used during a single watering session.
When you water, you should always drench the soil until water flows freely out of the bottom drainage holes. This saturates the root zone completely and flushes out built-up mineral salts. Overwatering occurs when soil stays wet for too long without air pockets, suffocating the roots and causing anaerobic rot.
[Proper Saturation] -> Deep drench until water runs out of drainage holes.
[Proper Drying]     -> Air returns to soil pores as plant draws moisture up.
[Overwatering]      -> Watering too frequently keeps soil pores constantly filled with water, blocking oxygen.
How to Water Correctly: The “Lift & Saturation” Method
Instead of following a strict calendar schedule—which ignores changing humidity, temperature, and seasonal growth rates—use physical checks:
- The “Lift-the-Pot” Test: Feel the weight of the pot when fully saturated versus completely dry. Soil loses substantial weight as moisture evaporates. A dry pot feels surprisingly light.
- The Finger Test: Insert your finger 2 inches into the soil mix. If soil clings to your skin and feels cool, moisture is present. If it comes out dry and clean, it’s time to water.
- Bottom Watering: Place pots with bottom drainage holes into a basin filled with 1–2 inches of water for 20–30 minutes. The soil draws moisture upward via capillary action. This prevents soil compaction and keeps surface pest issues under control.
Water Quality Matters: Tap, Minerals, and Sensitive Species
Not all tap water is equal. Municipal tap water often contains chlorine, chloramines, fluoride, and dissolved minerals (calcium and magnesium). While hardy species tolerate tap water easily, sensitive tropical plants react poorly to mineral buildup.
| Water Sensitivity Level | Typical Symptoms | Recommended Water Type | Example Species |
| High | Brown leaf margins, crispy tips, sudden leaf spotting | Distilled, Rainwater, Reverse Osmosis | Calathea, Prayer Plant, Spider Plant, Peace Lily |
| Moderate | Mild tip browning over time, white mineral crust on soil | Filtered Water, Stagnant Tap (let sit 24 hrs) | Fiddle Leaf Fig, Pothos, Monstera, Rubber Tree |
| Low | Rarely shows visible stress from tap water | Standard Municipal Tap Water | Snake Plant, ZZ Plant, Cacti, Pothos |
3. Substrate Engineering: Custom Soil Mixes for Every Plant Family
Standard dense potting soil straight out of the bag works poorly for most indoor plants. Out-of-the-bag potting soil is designed to hold moisture outdoors under hot sun, but indoors, it collapses, compacts, and starves root systems of oxygen.
Essential Soil Ingredients & Their Functions
Building an ideal substrate requires balancing water retention with aeration and drainage:
- Peat Moss / Coco Coir: The moisture-retentive base. Coco coir is a sustainable alternative to peat moss with a neutral pH.
- Perlite: Volcanic glass expanded by heat. Creates coarse air pockets and speeds up drainage.
- Pumice: Heavier, porous volcanic rock that stays evenly distributed throughout the mix without floating to the top like perlite.
- Orchid Bark (Fir Bark): Provides structural support and creates large oxygen voids, mimicking the natural environments of tree-climbing epiphytes.
- Horticultural Charcoal: Absorbs impurities, sweetens soil, and prevents anaerobic bacteria buildup in wet zones.
Standard Soil  --->  Dense, holds excess moisture, risks root suffocation indoors.
Custom Blend   --->  [Base (Coir/Peat)] + [Aeration (Perlite/Pumice)] + [Chunk (Bark)] = Healthy Roots
3 Easy DIY Mix Recipes
Creating custom mixes at home gives roots the precise balance of aeration and moisture retention they need:
- Standard Tropical Mix (Foliage & General Care):
- 2 parts Coco Coir or Peat Moss
- 1 part Perlite
- 1 part Orchid Bark
- Ideal for: Pothos, Philodendrons, Monstera, Syngoniums.
- Aroid Chunk Mix (High Aeration / Epiphytic):
- 2 parts Orchid Bark
- 1 part Coco Coir
- 1 part Perlite or Pumice
- 1/2 part Horticultural Charcoal
- Ideal for: Anthuriums, Monstera Deliciosa, Epipremnum, Orchid species.
- Succulent & Cactus Fast-Draining Mix:
- 1 part Standard Soil
- 1 part Pumice
- 1 part Coarse Sand or Fine Gravel
- Ideal for: Cacti, Echeveria, Haworthia, Sansevieria.
For a deeper dive into soil chemistry and ratios, read our complete potting soil mix guide.
4. Visual Diagnostic Matrix: What Is Your Plant Telling You?
When plants experience stress, symptoms often overlap. Identifying the specific cause prevents incorrect treatments that make the problem worse.
Yellow Leaves: Overwatering vs. Underwatering vs. Natural Aging
Yellowing (chlorosis) is a broad stress response, but key details reveal the underlying cause:
- Overwatering (Root Rot): Yellowing affects multiple leaves across the middle and lower sections of the plant simultaneously. Affected leaves feel soft, limp, or squishy. Soil remains wet, and the base of the stem may turn dark or feel mushy.
- Underwatering: Yellowing starts on older, lower leaves as the plant draws moisture from mature tissue to protect new growth. Leaves feel papery, brittle, and dry. Soil pulls away from the inside edges of the pot.
- Natural Aging: Single lower leaf turns yellow and drops off gradually every few weeks or months while new growth develops at the top. This is normal plant behavior.
Crispy Brown Tips vs. Soft Brown Spots
- Crispy Brown Tips/Edges: Low ambient humidity, high mineral levels from tap water, or underwatering. The tissue is dry and snaps easily.
- Soft, Dark Brown/Black Spots with Yellow Halos: Bacterial or fungal infection, often caused by overwatering or misting foliage without proper airflow. The tissue is soft and weak.
5. Integrated Pest Management (IPM): Identify, Isolate, Eliminate
Pests thrive indoors where natural predators are absent. Catching infestations early makes eradication much easier.
Identifying Common Indoor Pests
- Fungus Gnats: Small, dark flies crawling on soil or hovering near pots. Their larvae feed on organic matter and delicate feeder roots in damp soil. If gnats are currently taking over your space, follow our targeted step-by-step tutorial on how to get rid of fungus gnats.
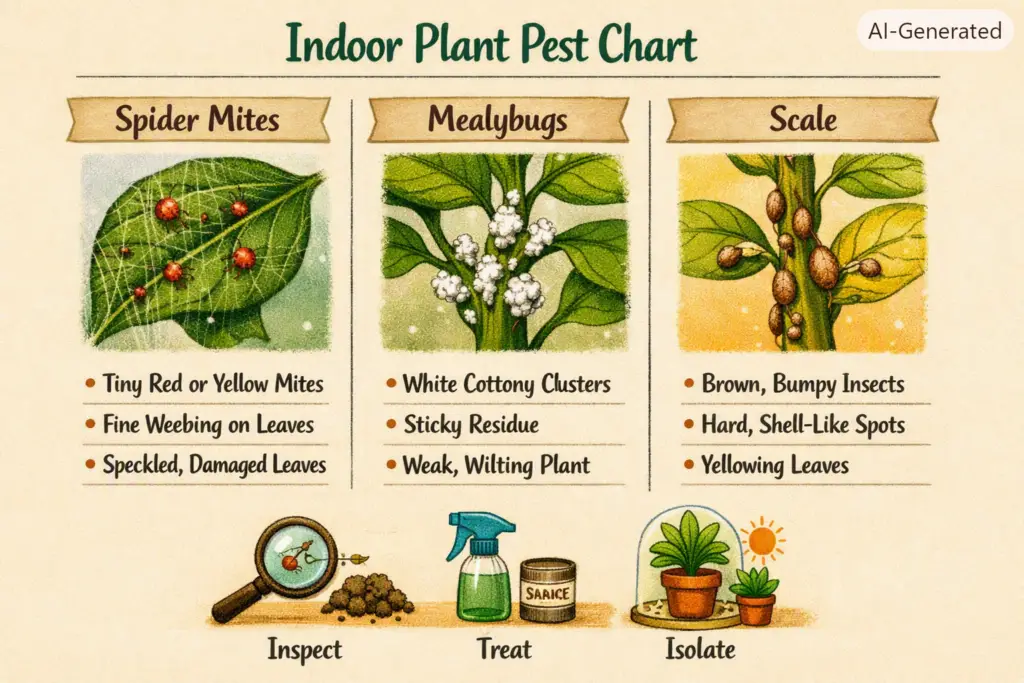
- Spider Mites: Extremely small reddish-brown pests found on the undersides of leaves. Early signs include fine web clusters in leaf forks and tiny yellow speckling across leaf surfaces.
- Mealybugs: White, cottony clusters nestled in leaf joints, stem crevices, and under leaves. They suck plant sap, secreting sticky honeydew.
- Scale: Small, immobile brown bumps that look like waxy shells attached along stems and leaf veins.
The 3-Step Treatment Protocol
Treating infestations requires a systematic approach to disrupt pest life cycles:
[Step 1: Isolate & Clean]  ---> Quarantine plant; physically spray down leaves to drop pest counts.
[Step 2: Contact Treatment] ---> Apply insecticidal soap or diluted neem oil thoroughly every 5–7 days.
[Step 3: Systemic Control]  ---> Add systemic granules or Mosquito Bits to soil to kill eggs and larvae.
- Isolation & Physical Removal: Move the affected plant away from other houseplants immediately to prevent spread. Take the plant to the sink or shower and rinse foliage with lukewarm water to physically wash away pests.
- Topical Contact Sprays: Spray all plant surfaces thoroughly with Insecticidal Soap, Pure Neem Oil (mixed with emulsifying dish soap), or 70% Isopropyl Alcohol applied with a cotton swab directly onto visible pests. Repeat every 5 to 7 days for 3 to 4 weeks to interrupt new hatching generations.
- Soil Treatments: For soil-borne pests like fungus gnats, treat watering sessions with Bacillus thuringiensis israelensis (BTI, found in Mosquito Bits) to eradicate soil larvae naturally without harming roots.
6. Seasonal Care Adjustments
Indoor environments change dramatically between seasons, requiring adjustments to your care routine.
| Care Parameter | Spring & Summer (Active Growth) | Fall & Winter (Dormancy) |
| Watering | Higher frequency; deep soak when soil dries 25–50%. | Reduced frequency; allow soil to dry 50–75% between sessions. |
| Fertilizing | Apply balanced liquid fertilizer at half-strength every 2–4 weeks. | Pause fertilizing completely; plants cannot process nutrients while dormant. |
| Lighting | Monitor windows for harsh direct sun that can burn foliage. | Move plants closer to windows or install dedicated LED grow lights. |
| Humidity & Temp | Keep plants away from air conditioner vents and cold drafts. | Use cold-mist humidifiers; keep plants away from heat registers and radiators. |
Frequently Asked Questions (FAQs)
How do I know when it’s time to repot my houseplant?
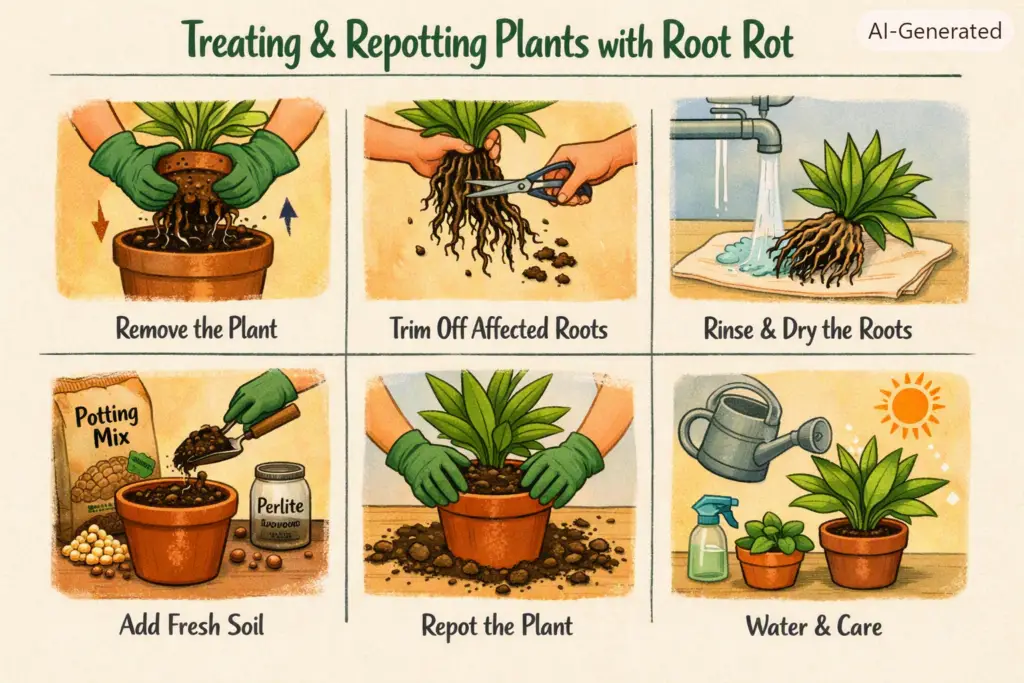
Signs include roots growing out of bottom drainage holes, water running straight through without absorbing, or slow growth during spring and summer. Always choose a replacement pot that is only 1 to 2 inches larger in diameter than the previous pot. Learn how to refresh root systems safely in our guide on how to repot houseplants step-by-step.
Can I use standard garden soil for indoor houseplants?
No. Garden soil contains heavy clay, weed seeds, pathogens, and insect larvae. It compacts quickly inside containers, cutting off oxygen access and killing houseplant roots.
What causes white mold on houseplant soil?
White fuzzy surface growth is typically a harmless saprophytic fungus feeding on organic matter in damp soil. It indicates low airflow, reduced light, or persistent surface moisture. Scrape off the surface mold, increase air circulation with a small fan, and let the topsoil dry out between waterings.
Why are my indoor plant leaves turning yellow and dropping off?
Yellowing foliage is most commonly caused by overwatering, which damages the root system and prevents it from taking up nutrients. Other causes include severe underwatering, insufficient light, cold drafts, or natural aging of lower leaves.
How do I raise humidity indoors without a humidifier?
Group plants close together so their combined transpiration creates a localized microclimate. Placing pots on trays filled with pebbles and water (keeping the pot base above the water line) also raises humidity directly around the foliage. Misting provides only a temporary boost (lasting minutes) and can spread fungal pathogens across leaves.
Practical Troubleshooting Checklist
Keep this quick reference guide handy whenever your plants show signs of stress:
- [ ] Check Soil Moisture: Feel the top 2 inches of soil and lift the pot to gauge its weight before watering.
- [ ] Inspect Leaf Undersides: Look closely for web clusters, cottony spots, or tiny moving specks.
- [ ] Evaluate Light Distance: Measure the exact distance from the nearest window to ensure the plant receives enough illumination.
- [ ] Inspect Drainage: Ensure the pot has functional bottom drainage holes and never sits in standing runoff water.
- [ ] Clean Foliage: Wipe dust off leaves monthly with a damp cloth to keep stomata clear for transpiration and light absorption.
Read about Plants Plants | Springer Nature Link
When to Water your Plants in Day or Night? – knowabteverything
How to fix Plants Leaves which Turn Yellow? – knowabteverything

2 Comments