
How to Fix Expo Status Bar Overlapping iPhone Notches and Dynamic Island Devices You have ever tested an Expo app on a modern iPhone and noticed your header, title, or navigation controls hiding behind the notch or Dynamic Island, you’ve run into one of the most common UI issues in React Native development.
The frustrating part is that everything may look perfectly fine in the simulator or on Android. Then you open the same screen on an iPhone 15 Pro and suddenly your carefully designed layout is partially hidden behind system UI elements.
I’ve seen this happen repeatedly in Expo Router projects, especially when building custom headers, splash screens, and full-screen layouts. In most cases, the fix takes less than five minutes once you understand what’s causing the problem.
This guide explains why the issue occurs, why React Native’s built-in solution isn’t always enough, and how to implement a reliable fix using react-native-safe-area-context.
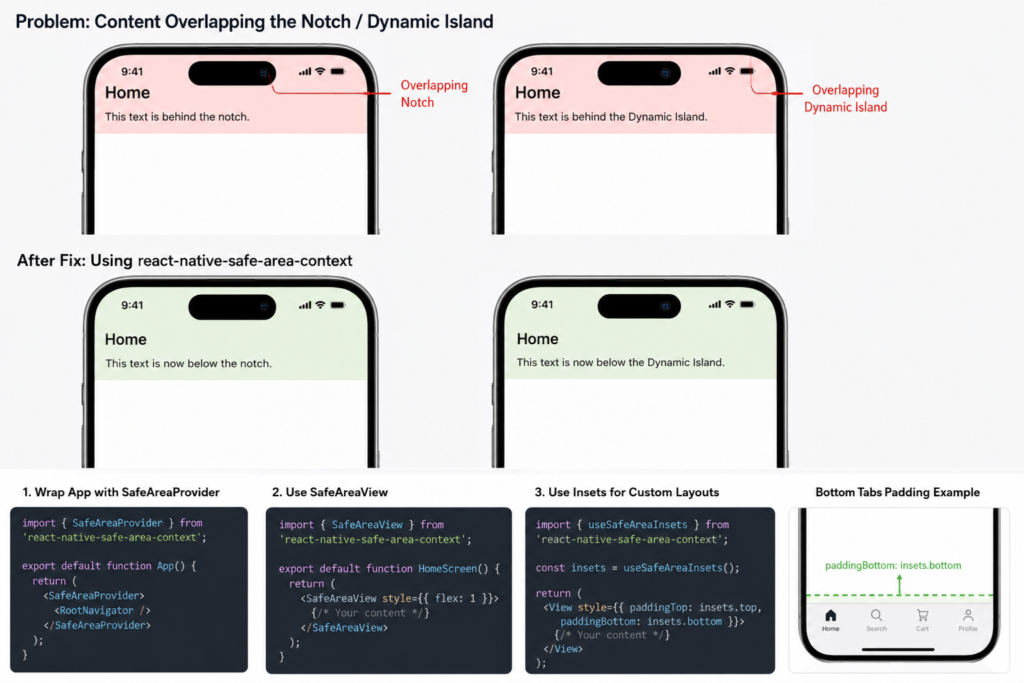
Table of Contents
- Why content overlaps the iPhone notch or Dynamic Island
- Why React Native’s built-in SafeAreaView can be unreliable
- The recommended solution for Expo projects
- Installing react-native-safe-area-context
- Setting up SafeAreaProvider correctly
- Using SafeAreaView the right way
- Expo Router configuration example
- Working with custom safe area insets
- Fixing bottom tab spacing
- Creating full-screen image layouts
- Common mistakes developers make
- Frequently asked questions
- Final takeaway
Why Does Content Overlap the iPhone Notch or Dynamic Island?
Modern iPhones reserve part of the screen for system elements such as:
- The status bar
- The notch
- The Dynamic Island
- The Home Indicator
When your app ignores those protected areas, content can end up underneath them.
Typical symptoms include:
- Headers partially hidden
- Text touching the status bar
- Buttons becoming difficult to tap
- Navigation controls appearing too high on the screen
For users, these issues immediately make an app feel unfinished.
For developers, they often appear unexpectedly because the problem isn’t always visible during initial testing.
Why React Native’s Built-In SafeAreaView Sometimes Falls Short
Many developers start with:
import { SafeAreaView } from 'react-native';
At first glance, this seems like the correct solution. After all, it’s built into React Native.
The problem is that the built-in implementation has limitations, particularly in modern navigation-heavy applications.
In real-world Expo projects, I’ve encountered cases where the native SafeAreaView:
- Behaved differently across iOS versions
- Didn’t work consistently inside nested navigators
- Produced unexpected spacing issues
- Caused layout problems when using Expo Router
- Offered limited control over custom insets
Because of these limitations, the React Native community largely standardized on a more robust solution: react-native-safe-area-context.
The Recommended Fix
For most Expo applications, the safest approach is to use:
react-native-safe-area-context
This package is actively maintained and designed specifically to handle modern device layouts.
Benefits include:
- Reliable Dynamic Island support
- Better compatibility with Expo Router
- Consistent behavior across iOS and Android
- Access to custom safe area values
- Improved navigation integration
- Better support for future device designs
If you’re starting a new Expo project today, this should be your default choice.
Step 1: Install react-native-safe-area-context
Expo makes installation straightforward.
Run:
npx expo install react-native-safe-area-context
Once installation is complete, restart the development server:
npx expo start -c
Clearing the cache prevents stale layout data from causing confusion during testing.
Step 2: Wrap Your App with SafeAreaProvider
This is the step developers most often miss.
Installing the package alone isn’t enough.
The provider must wrap your application so safe area information can be calculated and shared throughout the component tree.
Root Application Example
import { SafeAreaProvider } from 'react-native-safe-area-context';

export default function App() {
  return (
    <SafeAreaProvider>
      <RootNavigator />
    </SafeAreaProvider>
  );
}
Think of SafeAreaProvider as the component responsible for measuring the usable screen area and making that information available to everything below it.
Without it, safe area calculations may be inaccurate or unavailable.
Expo Router Setup Example
If you’re using Expo Router, the provider typically belongs inside your root layout file.
app/_layout.tsx
import { Stack } from 'expo-router';
import { SafeAreaProvider } from 'react-native-safe-area-context';

export default function RootLayout() {
  return (
    <SafeAreaProvider>
      <Stack />
    </SafeAreaProvider>
  );
}
This ensures every route automatically receives correct safe area information.
In many cases, this single change resolves Dynamic Island overlap issues throughout the entire application.
Step 3: Use the Correct SafeAreaView
Once the provider is configured, make sure you’re importing the correct component.
Avoid This
import { SafeAreaView } from 'react-native';
Use This Instead
import { SafeAreaView } from 'react-native-safe-area-context';
A basic example:
import { SafeAreaView } from 'react-native-safe-area-context';
import { Text } from 'react-native';

export default function HomeScreen() {
  return (
    <SafeAreaView style={{ flex: 1 }}>
      <Text>Welcome</Text>
    </SafeAreaView>
  );
}
The component automatically positions content within the safe region of the screen.
A Real-World Example
Imagine you’re building a food delivery application.
Your home screen starts with:
- A greeting
- A search bar
- Restaurant categories
Everything looks perfect on Android.
Then a tester opens the app on an iPhone 15 Pro.
Suddenly:
- The greeting sits under the Dynamic Island
- The search bar feels cramped
- The screen looks visually broken
After wrapping the app in SafeAreaProvider and switching to the correct SafeAreaView, the layout immediately adjusts itself.
No manual device detection.
No hard-coded padding.
No separate iPhone-specific code.
That’s exactly why this package has become the standard solution.
Using Custom Safe Area Insets
Sometimes you need more control than a standard SafeAreaView provides.
For example:
- Building a custom header
- Creating animated layouts
- Designing floating UI elements
In those situations, use useSafeAreaInsets().
import { useSafeAreaInsets } from 'react-native-safe-area-context';
Example:
const insets = useSafeAreaInsets();

<View
  style={{
    paddingTop: insets.top,
  }}
>
  <Text>Custom Header</Text>
</View>
The hook provides:
topbottomleftright
These values automatically adapt to the device being used.
Stop Hard-Coding Top Padding
One mistake I still see in production code is this:
paddingTop: 50
It might work on one device.
It might fail on another.
Different iPhones have different safe area requirements, and future devices may introduce new screen layouts.
A safer approach is:
const insets = useSafeAreaInsets();

paddingTop: insets.top;
This allows your UI to adapt automatically without maintenance headaches later.
Fixing Bottom Tab Spacing
The top of the screen isn’t the only area that matters.
Many developers notice bottom navigation controls sitting too close to the Home Indicator.
This is especially common when building custom tab bars.
Using the bottom inset solves the problem:
const insets = useSafeAreaInsets();

<View
  style={{
    paddingBottom: insets.bottom,
  }}
>
  <BottomNavigation />
</View>
The result feels more polished and prevents accidental gesture conflicts.
Creating Full-Screen Backgrounds Without Breaking Layouts
Not every screen should respect safe areas completely.
Examples include:
- Splash screens
- Login pages
- Hero banners
- Video players
In these situations, it’s common to allow images to extend edge-to-edge while keeping interactive content inside safe boundaries.
<ImageBackground
  source={backgroundImage}
  style={{ flex: 1 }}
>
  <SafeAreaView style={{ flex: 1 }}>
    <Content />
  </SafeAreaView>
</ImageBackground>
This creates a modern full-screen appearance without sacrificing usability.
Common Mistakes to Avoid
Forgetting SafeAreaProvider
Without the provider, safe area values may be incorrect or unavailable.
Using the Wrong SafeAreaView
Always import from:
react-native-safe-area-context
Hard-Coding Layout Values
Avoid fixed spacing such as:
paddingTop: 40
Device-specific values rarely age well.
Testing Only on Android
Android and iOS handle screen cutouts differently.
Always test on:
- iPhone Simulator
- Physical iPhone devices
- At least one Dynamic Island model
Ignoring Landscape Orientation
Landscape mode often reveals layout problems that aren’t visible in portrait mode.
Rotate your device during testing to catch issues early.
Quick Troubleshooting Checklist
If content is still overlapping the notch:
- Confirm the package is installed
- Verify
SafeAreaProviderwraps the root app - Import SafeAreaView from the correct package
- Replace hard-coded padding values
- Use
useSafeAreaInsets()when building custom layouts - Clear the Expo cache
- Test on a physical device when possible
Most safe area problems can be traced back to one of these items.
Frequently Asked Questions
Is react-native-safe-area-context included with Expo?
Expo supports it directly and recommends installation through:
npx expo install react-native-safe-area-context
Should I still use React Native’s built-in SafeAreaView?
For simple projects, it may work.
For production Expo applications, especially those using Expo Router or custom navigation, react-native-safe-area-context is generally the more reliable choice.
Do I need SafeAreaProvider when using Expo Router?
Yes.
The provider should wrap your root layout so every route has access to accurate safe area measurements.
Can I intentionally ignore safe areas?
Absolutely.
Many apps allow background images and videos to extend behind the notch while keeping buttons and text within safe boundaries.
Does this solution work on Android?
Yes.
Although Android devices handle display cutouts differently, react-native-safe-area-context provides a consistent API across both platforms.
Final Takeaway
If your Expo app’s content is hiding behind the iPhone notch or Dynamic Island, don’t waste time adding device-specific padding or writing custom workarounds.
The most reliable fix is simple:
- Install
react-native-safe-area-context - Wrap your app with
SafeAreaProvider - Use
SafeAreaViewfrom the package - Access dynamic spacing with
useSafeAreaInsets()
This approach works across modern iPhones, integrates cleanly with Expo Router, and adapts automatically as new devices are released.
It’s a small change, but it’s one of those improvements that instantly makes an app feel more polished, professional, and ready for real users.
The Ultimate React Native Beginner Roadmap (2026 Edition) – knowabteverything
The 3-Line Flexbox Trick That Centers Anything in React Native – knowabteverything
How to Generate Store-Ready iOS & Android App Icons (Without Figma or Photoshop) – knowabteverything
Expo — Build Native Apps with React

About Amish
Hi, I’m Amish, and developer.
I write practical React Native, Node.js, MongoDB, and Supabase tutorials based on real projects and testing.
[…] How to Fix Expo Status Bar Overlapping iPhone Notches and Dynamic Island Devices – knowabtever… […]
[…] How to Fix Expo Status Bar Overlapping iPhone Notches and Dynamic Island Devices – knowabtever… […]
[…] How to Fix Expo Status Bar Overlapping iPhone Notches and Dynamic Island Devices – knowabtever… […]