
Mobile App Image Optimization: How to Reduce File Size Without Sacrificing Image Quality A slow-loading app can frustrate users in seconds. While developers often focus on code optimization, one of the biggest performance bottlenecks is much simpler: oversized images.
I’ve seen apps where a few unoptimized banners and product photos added tens of megabytes to the installation package and noticeably slowed downloading times. In many cases, the visual quality wasn’t even better—the images were simply larger than necessary.
The good news is that modern compression techniques allow you to significantly reduce image size while maintaining a crisp, professional appearance. Whether you’re building an Android app, an iOS application, or a cross-platform mobile product, proper image optimization can improve performance, reduce storage usage, and create a smoother user experience.
This guide explains how to compress images for mobile apps without losing quality and shares practical optimization techniques used by experienced developers and designers.
Table of Contents
- Why Image Optimization Matters
- What Makes Mobile App Images So Large?
- How to Compress Images Without Losing Quality
- Choosing the Right Image Format
- Mobile App Image Optimization Guidelines
- Android Optimization Best Practices
- iOS Optimization Best Practices
- Common Mistakes That Hurt Performance
- Recommended Compression Tools
- Real-World Optimization Example
- Frequently Asked Questions
- Final Thoughts
Why Image Optimization Matters in Mobile Apps
Images often account for a significant portion of an app’s total size. Product photos, onboarding illustrations, splash screens, marketing banners, and UI graphics can quickly add up.
When images aren’t optimized, users may experience:
- Slower app startup times
- Increased data consumption
- Longer downloads and updates
- Higher memory usage
- Reduced performance on older devices
For users on limited mobile data plans or slower network connections, these issues become even more noticeable.
The User Experience Impact
Imagine downloading a shopping app. One version opens almost instantly, while another takes several seconds to display product images because every photo is unnecessarily large.
Most users won’t know the technical reason behind the delay. They’ll simply feel that one app is faster and better.
That’s why image optimization isn’t just a technical task—it’s part of delivering a great user experience.
What Makes Mobile App Images So Large?
Before reducing image size, it helps to understand where the extra weight comes from.
Images Are Often Exported Much Larger Than Needed
A common mistake is using the original design asset directly inside the app.
For example:
- Original image: 4000 × 3000 pixels
- Actual display size in app: 800 × 600 pixels
The app downloads and processes far more data than the user ever sees.
Metadata Adds Hidden Weight
Photos often contain embedded information such as:
- Camera details
- GPS coordinates
- Device settings
- Editing history
This information provides no visual benefit inside an app but still increases file size.
Wrong File Formats
Many teams default to PNG for everything. While PNG is excellent for certain graphics, it’s often unnecessary for photos and large visual assets.
Choosing the right format can reduce file sizes dramatically.
Overly High Quality Settings
Exporting every image at maximum quality may sound like a good idea, but beyond a certain point, file size increases dramatically while visual improvements become nearly impossible to notice on a mobile screen.
How to Compress Images for Mobile Apps Without Losing Quality
The phrase “without losing quality” can be misleading.
Technically, some compression methods alter image data. The real goal is to maintain visual quality so users cannot see a meaningful difference.
Here is the process that consistently delivers the best results.
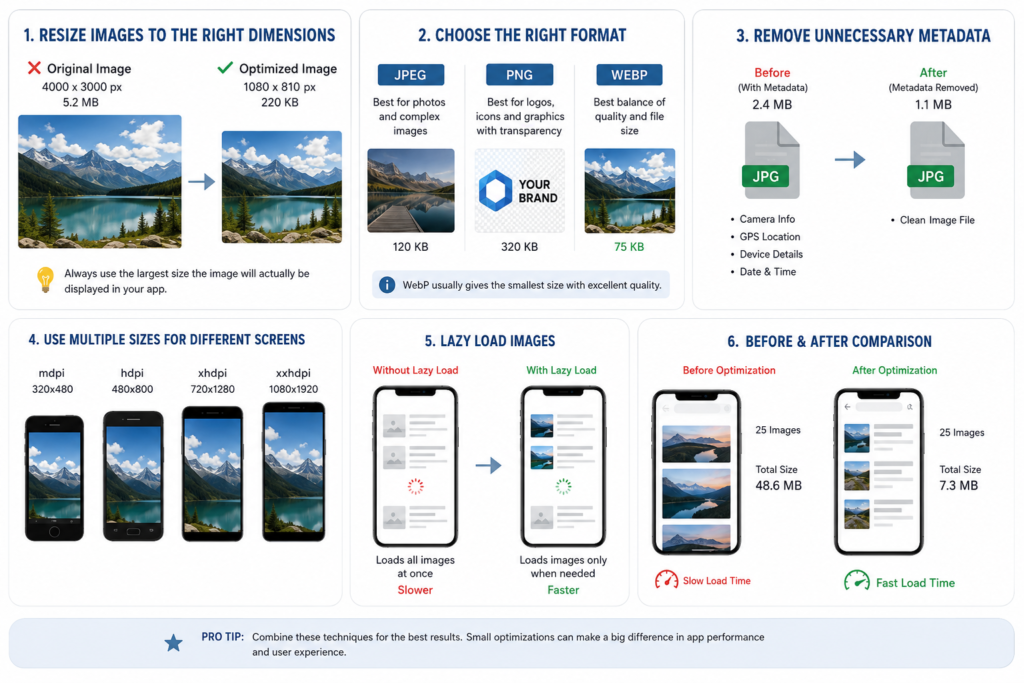
Step 1: Resize Before Compressing
Resizing usually has a bigger impact than compression itself.
Ask:
What is the largest size this image will ever be displayed inside the app?
If an image never appears wider than 1080 pixels, there’s rarely a reason to keep a 4000-pixel version.
Example
Before optimization:
- Resolution: 4000 × 3000
- File size: 5 MB
After resizing:
- Resolution: 1080 × 810
- File size: under 500 KB
On most smartphones, users won’t notice any difference in clarity.
Step 2: Choose the Right Compression Level
Aggressive compression may create visible artifacts, especially around text and sharp edges.
A better approach is to test several compression levels and compare them on real devices rather than relying solely on desktop previews.
In practice, moderate compression often cuts file sizes substantially while preserving excellent visual quality.
Step 3: Remove Unnecessary Metadata
Many optimization tools automatically strip metadata during export.
This is essentially free optimization because users never see this information.
Step 4: Test on Actual Devices
A graphic that looks perfect on a designer’s high-resolution monitor may appear different on a budget Android device.
Always preview optimized images on:
- Small-screen phones
- Large-screen phones
- Tablets when applicable
Real-world testing prevents surprises after launch.
Which Image Format Should You Use?
Selecting the correct format is one of the easiest ways to improve performance.
WebP
For most mobile applications, WebP is now the preferred choice.
Advantages:
- Smaller files than PNG
- Often smaller than JPEG
- Supports transparency
- Excellent image quality
- Broad Android and iOS support
For many apps, converting PNG assets to WebP can reduce storage requirements significantly.
PNG
PNG remains useful for:
- Logos
- Icons
- UI elements
- Graphics requiring transparency
However, PNG files can become unnecessarily large when used for photographs.
JPEG
JPEG is still a solid choice for:
- Product photos
- Background images
- Large photographic content
Its primary limitation is the lack of transparency support.
Quick Comparison
| Format | Best For | File Size | Transparency |
|---|---|---|---|
| JPEG | Photos | Small | No |
| PNG | UI Graphics | Larger | Yes |
| WebP | Most Mobile Assets | Very Small | Yes |
For many modern apps, WebP provides the best balance between quality and performance.
Mobile App Image Optimization Guidelines
Over time, several best practices have emerged as industry standards.
Deliver Multiple Image Sizes
Different devices have different screen densities.
Instead of serving one oversized image to everyone, create multiple versions optimized for various screen sizes.
This reduces unnecessary downloads and improves performance.
Use Lazy Loading
Not every image needs to load immediately.
Consider an e-commerce app with hundreds of products.
Loading every product image at startup wastes bandwidth and memory.
Instead:
- Load visible images first
- Fetch additional images as users scroll
This approach creates a noticeably faster experience.
Use Vector Graphics When Appropriate
Icons and simple illustrations are often better as vector assets.
Benefits include:
- Extremely small file sizes
- Sharp rendering at any resolution
- Easier scaling across devices
For UI icons, vector graphics are frequently the most efficient option.
Optimize Images During Development
Image optimization should be part of the development workflow—not a last-minute task before release.
Teams that automate optimization during builds typically achieve more consistent results and avoid shipping oversized assets.
Android Image Optimization Best Practices
Android offers several built-in advantages for handling optimized images.
Use WebP Assets
Google recommends WebP for many image use cases because it provides strong compression without noticeable quality loss.
Benefits include:
- Smaller app packages
- Faster loading
- Lower bandwidth usage
Use Vector Drawables for Icons
Instead of shipping multiple bitmap files for different densities, vector drawables can scale automatically.
This reduces APK size and simplifies asset management.
Provide Density-Specific Resources
Android supports:
- mdpi
- hdpi
- xhdpi
- xxhdpi
- xxxhdpi
Providing appropriately sized assets ensures devices download only what they need.
iOS Image Compression Best Practices
Apple devices feature high-resolution displays, making efficient image handling especially important.
Export Assets at Required Retina Sizes
Rather than including oversized images, generate optimized assets specifically for:
- @1x
- @2x
- @3x
This helps balance sharpness and storage efficiency.
Optimize Before Packaging
Many developers focus on code optimization while overlooking media assets.
Reducing image size before packaging often produces meaningful reductions in application size with minimal effort.
Test Across Device Generations
An image that loads instantly on the latest iPhone may perform differently on older devices.
Testing across multiple hardware generations provides a more accurate picture of real-world performance.
Common Image Optimization Mistakes
Even experienced teams occasionally make these mistakes.
Uploading Original Camera Images
Modern smartphone photos can exceed several megabytes each.
They should almost always be resized before being used in an app.
Using PNG for Every Asset
PNG has valuable use cases, but treating it as the default format often results in unnecessary bloat.
Compressing Files Repeatedly
Repeated exports and compression cycles can gradually reduce image quality.
Whenever possible, work from the original source file.
Ignoring Real Device Testing
Desktop previews don’t always reflect actual mobile performance.
Testing on physical devices remains one of the most reliable quality checks.
Recommended Image Compression Tools
TinyPNG
A long-standing favorite for quickly optimizing PNG and JPEG files.
Ideal for:
- Designers
- Small projects
- Manual optimization workflows
Squoosh
Google’s browser-based optimization tool.
Useful features include:
- Side-by-side comparisons
- Format testing
- Adjustable compression settings
ImageOptim
Popular among Mac users for lossless optimization and metadata removal.
Sharp
A powerful Node.js library widely used in automated image-processing pipelines.
Excellent for:
- SaaS applications
- Content-heavy apps
- Automated asset workflows
Real-World Example: Reducing App Image Size
A travel application contains:
- 50 destination photos
- Average size: 3 MB each
Total image weight:
150 MB
After optimization:
- Resize images to actual display dimensions
- Convert images to WebP
- Remove metadata
- Apply moderate compression
New average size:
350 KB per image
Total image weight:
Approximately 17.5 MB
The Result
The app:
- Downloads faster
- Consumes less storage
- Uses less bandwidth
- Feels more responsive
Most importantly, users typically cannot see a meaningful difference in image quality.
Frequently Asked Questions
How can I compress images for mobile apps without losing quality?
The most effective approach is:
- Resize images first.
- Remove unnecessary metadata.
- Use WebP when possible.
- Apply moderate compression.
- Test on real devices.
This combination typically provides the best balance between quality and performance.
Is WebP better than PNG?
For many mobile app use cases, yes.
WebP often delivers substantially smaller file sizes while still supporting transparency and maintaining excellent visual quality.
How much can image optimization reduce app size?
The exact reduction depends on the asset library, but savings of 30% to 80% are common when images haven’t been optimized previously.
Should I use JPEG or PNG for UI elements?
PNG is generally better for UI graphics, icons, and transparent elements.
JPEG is usually a better fit for photographs and image-heavy content.
Does image optimization improve app speed?
Yes.
Smaller images load faster, consume less memory, and reduce bandwidth usage, all of which contribute to a smoother user experience.
Final Thoughts
Image optimization is one of the highest-impact performance improvements available to mobile app teams. It doesn’t require major architectural changes, expensive infrastructure upgrades, or complex development work.
In most cases, the biggest wins come from a few straightforward practices:
- Resize images to their actual display dimensions
- Use modern formats such as WebP
- Remove unnecessary metadata
- Avoid oversized assets
- Test on real devices
The best image optimization is almost invisible. Users won’t notice that an image has been compressed—but they will notice that your app loads faster, feels smoother, and takes up less space on their device.
Read about The Ultimate React Native Beginner Roadmap (2026 Edition) – knowabteverything
The 3-Line Flexbox Trick That Centers Anything in React Native – knowabteverything
Why Is My FlatList Not Updating When State Changes? 4 Fast Solutions – knowabteverything
The Ultimate React Native Beginner Roadmap (2026 Edition)

About Amish
Hi, I’m Amish, and developer.
I write practical React Native, Node.js, MongoDB, and Supabase tutorials based on real projects and testing.
[…] Mobile App Image Optimization: How to Reduce File Size Without Sacrificing Image Quality – kno… […]
[…] Read about Mobile App Image Optimization: How to Reduce File Size Without Sacrificing Image Quality – kno… […]
[…] Mobile App Image Optimization: How to Reduce File Size Without Sacrificing Image Quality – kno… […]